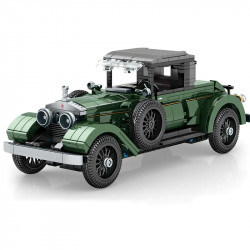
Review Build: 1910 Ford Model T

Review Build: 1910 Ford Model T
My son comes over to see what I'm doing as I begin to assemble this gorgeous 1910 Ford Model T. After I just made the same model the other day, he asks why I'm creating it again. Since he wasn't wholly incorrect, I chuckled. But then, as though I didn't understand what he was talking about, I mocked him by saying that I hadn't. Even if the colors are similar, let me warn you that this 1910 model is very different from the 1908 model. Naturally, I kept from him the fact that I would be [practically] creating the same model again as soon as I had the Hobby-Town In-Store Exclusive Red 1908 Ford Model T.
Indeed, there are many similarities between the 1908 and 1910 models. However, most of the specifics are different. I might not be able to discern the difference if I removed my glasses and squinted. But this updated version of the marginally later Model T is most certainly not a rerun. This build has a lot more curves—additional information on the car's interior and underbelly.
Additionally, there are no support bars on the windshield that attempt to pull it out of alignment. The windscreen does tilt back, in fact! Not to mention the convenient addition of a spare tire. From pedals to everything else, this puppy has it all! Additionally, the driver-side door had a horn honker device attached to it (thanks to AnimateOrange for teaching me about it).
Do I like this model, then? Indeed, I do. It feels like a completely new build experience because it differs from the 1908 model enough. Additionally, some aspects of this version have gotten more manageable (like the collapsible canopy) while others have gotten harder (I'm looking at you, chairs). Even yet, the places where the difficulty has increased are not the product of poor design but instead of new features, details, and enhancements. That's not to say I didn't encounter any issues during the build—after all, I nearly always do. And I'll tell you everything so you might be able to steer clear of some of my errors.
But first, I want to give the designers of this build some credit. This build contains multiple places where you must fold a 90-degree angle directly along a small strip, trim, or edge (see part 3 below for an example). And doing that cleanly is typically tricky. Not this time, though. This model's approach to these edge folds was fantastic. Here and elsewhere, they folded so neatly. I'm really grateful! Thank you! (said to the design group.)
However, the first thing that frustrated me about this build was figuring out which of the tabs that protruded through the floorboard I could twist and which I had to fold (part 1) because that gadget has a crap ton of slots! There are so many that it's difficult to distinguish between those that appear beneath seats or other objects and those that don't. I do not want twisted tabs on the floor that are apparent; however, thanks to the etching patterns, you can actually see the top and get a decent notion. But look and make a strategy. By "plan ahead," I mean to read ahead and determine where you can just twist. If you're concerned about twisted versus folded, that is.
Therefore, I exercised extra caution when manipulating the pedals on the sloping floorboard section. According to the directions, you may be able to twist these tabs. However, after turning the tabs, I took the further step of folding them flat—in particular, flat toward the taller end of the pedal, or "upward." Since there won't be much space underneath that angled floorboard once it's attached, I took this action.
I learned a lesson by doing something incorrectly because I believed it would look better. Could you not make the same mistake I did? I didn't go back and change this, so you can see how it doesn't fully function by looking at this section of my images. The tabs will end up on the inside if you attempt to attach the side panels (20 and 22) to the back panel (21). Generally speaking, I enjoy doing that thing as much as I can. I want to have as few tabs showing as possible at the end. However, it conflicts with the geometry in this instance. If you don't, the tabs wind up folded on the outside, giving the edge along that corner a weird look. I apologize as well for the strange positioning of the arrows in the center of the rear panel. Doing it close to the edges left the direction unclear, which is why I wanted to make it highly apparent.
When I tried to round the folded tabs over, it kept trying to ruin the trim, so I had some trouble with the part 24 trim that sits on top of the side panels. I ultimately decided just to quit it. The signal indicator next to the back license plate, which I assume is a brake light because there is only one, also irritated me in this similar area of the build. With two distinct designs on either side, I wasn't sure which way to align it. I probably should have checked out the 360-degree perspective, but I chose not to. Therefore, mine is the reverse of the 360-degree view. However, my method made more sense. So, meh?
It should come as no surprise that this model's fenders and footboards (parts 28/31) will require some of your build time. I did my best, but I don't get them precisely right. The best advice is to follow the directions, consult the trim section (29) as you are making them, and complete the task before attaching them to the rest of the model.
As I read this section of the instructions, I saw something that might make you laugh. As you can see, I glanced ahead and saw that there was an identical step at the bottom of the page when I constructed the signal indicator light at the top, creating two of them. In order to save mental energy, I went ahead and made three at this point. I had to return later and attach them after a lot more of the build was finished because I had entirely skipped over the area where they were connected. I'm going!
Putting my self-loathing aside, I want to add that the wheel treads (part 33) seemed delicate, at least to me. When I reached the last set of four tires, I ended up pulling the last portion of the tire strip halfway off, but I did OK with the first one I constructed (for the spare wheel). I seated the tab and tried to fold it over, but it broke right at the slot. In order to leave some fragile metal on either side of the hole, they manufactured these strips so thin that the slots hardly fit. Regretfully, there are no spare parts for this part. Fortunately, that only occurred once, and I took extra care with the others. Additionally, I was able to use it while feigning that it was secured. But use caution when handling these!
Speaking of fragile components, we've reached the front bumper. That's what this is. Anyway, it's part 39. There are numerous thin parts and tiny folds in this region. And forming isn't all that difficult. For the small strips you fold over at the very top or tips at either end, the instructions omitted an indicator. Based only on the part, these are meant to be rolled over at each end of the strip. So I did. Of course, you are free to do as you choose.
However, I recommend against attempting to fold the tabs over while attaching the bumper device to component 37 (the front of the engine bay, front axle, and front of everything). This section does not align with that idea. It's likely to get mangled if you do. That's precisely what I did. Fortunately (?) I had to remove the engine crank (part 40) because I had forgotten to install it. I unmangled it while it was off, and then I folded it very, very gently after twisting it before reattaching it.
This leads me to what I assume is a contentious issue. Where do the bumper thingy's end spurs go when the front part is attached to the rest of the constructed car? Because they cover the front fenders, as stated in the 360-degree video, the product images, and the directions. Which I did. Initially. Until the front wheels needed to be attached. The fenders were sitting on top of the wheels, which hardly fit underneath them. And so... I asked this inquiry. I decided to lever the fenders over and up over those spurs, giving the impression that those spurs support the fender. And this is how it should be. What are your thoughts?
Creating the collapsed roof, canopy, or whatever it is called is the next task I have for you (part 48). There is a phase in the formation process that is not adequately or consistently called out in the instructions. Fortunately, I saw it because I'm a detail-oriented person. But just in case you're not, here's what I'm referring to:
The last task is quite simple after that, although it's by no means simple. Forming (and fastening) the seat tops. In the end, these sections are lovely. Actually, my wife loved this build's pattern and form the most. However, it is difficult to determine the proper amount and location of curvature on the ends of each "flap" of components 49 and 50. I'm still unsure if I did it correctly.
Additionally, you must get them in the automobile as soon as you believe you have that down. It's intriguing to try to align the slots at the base of these parts with the tabs because the seats' bases are located deep inside the vehicle, making it impossible to get anything down there to help or persuade those tabs to be where you need them to be. Additionally, once you have the tabs aligned, don't be shocked if they barely poke through. I had to apply extra compelling pressure right on the seat close to the slot in order to expose enough of the tab to fold over.
However, after you reach this stage... I don't know how to spell that, but this figure is exceptionally stunning. However, I am aware of the sound I just produced. Imagine that you are aware of the sound I just produced as well, and we will be fine. You've finished creating it! Once again, I'm thrilled to have received this model directly from Fascinations for evaluation because I genuinely liked it. Although it may be difficult to tell at times, I don't allow it to influence what I have to say since you understand. I enjoy creating these models. I spent about 4.5 hours building this model by seeing the silent build movies in the YouTube playlist that is attached below. If you're genuinely bored. You require a visual aid to assist with a particular build component.
