Build: Drum Set

Build: Drum Set
I enjoyed myself a bit too much by including Chewie in this. In order to give readers an idea of the models' sizes, I suggest adding one picture of him in each post. It took me some time to find a suitable size comparison object for a global audience, but eventually, I realized that almost everyone is familiar with Legos! Naturally, Chewie would have to be the one. How could I resist letting him get a little more involved this time? Naturally, using toothpicks to carve drumsticks taught us to tolerate flawed results.
Now, the question is: do the toothpicks qualify as a mod as they are a cosmetic element? Other "mods" that I've done have involved decorating the model rather than actually changing it, but the decorations were typically a bit more intrusive or incorporated. They are merely sitting on the model here. Well, I'm going to call it a mod. Whoosh! Oh, wait, I totally forgot that I had invested more effort in attempting to replicate the incredible cymbal-shaping alteration that @iwallod on Instagram revealed. Apparently, Wookiees are complex with their drumming and put a lot of wear on the cymbals. Therefore, I didn't do it nearly as well as he did. But it certainly qualifies as a mod!
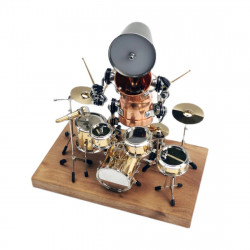
If you don't look too closely, this drum set replica is beautiful. That's how my results are, at least. When you look closely, this model does a great job of making minor errors appear. The subject that has been replicated is more to blame than the model itself. Uneven curves are challenging to make with the hands but simple to spot with the eye. Arranging curves in layers, where they should also be parallel or lined up, one curve on top of another? It will serve as a reminder that no matter how meticulous you are, this methodology will not yield flawless outcomes. Naturally, I'm simply being extremely harsh on myself, and it's not as horrible as I think. The model is also really stunning. In a two-sheet model, they crammed a lot of power. Just because I don't want to believe I did it terribly, I didn't do it very well, and I also like to think that it's pretty difficult to execute correctly.
In case my previous remarks were unclear, this model isn't straightforward. All the cylinders are part of that, but I've already adapted to them. The fragility and layering present the most significant obstacles, as well as how well everything fits together. If you enjoy a struggle that has a positive outcome, this model is a good fit for you.
Each drum is masterfully designed, with numerous layers in various diameters. The tensioning hardware, which is a separate, elevated component over the core cylinder, is located around the outside of the drums. If I were a drummer, I could give you a real name for this equipment. Additionally, there is the elevated rim of the drum tops at one cylinder. Although it creates a stunning visual impression, it also makes things more complicated.
Since the raised rims on the two smallest drums tended to be uneven, misaligned, and crooked, I wish they had connected them in more than two locations. Furthermore, the section that houses the tensioning gear for the drum tops is fastened straight to this, causing it to be misaligned as well (as seen in at least one of the close-up pictures in the gallery above).
Regarding the hardware components that are under tension... I secured the ends of the drum cylinders for the first set of drums, as instructed, before attaching these. However, considering how those two drums were mounted, I had trouble getting them in position and adequately formed. The hardware components should be connected to the end caps before being attached to the drums, as I actually did with the remaining drums. Getting the end caps over the drum cylinders can be challenging (you have to get the alignment precisely perfect), but the convenience of not needing to mold the components during attachment makes it worthwhile.
As for fragility—well, with a paradigm like this, that's inevitable. Along with all the little things here and there, there are numerous tripod stands to deal with. Just be advised that you will need to handle this model carefully during the assembly process. Fortunately, the designers considered this in advance and had each drum and cymbal part assembled separately and left aside. This way, the model is only extremely fragile when everything is finally put together and attached to the foundation.
This could, however, cause confusion. I also became confused. However, I doubt that I did. But everything seems fine to me. What am I discussing, then? Do you remember how I mentioned that this has a lot of tripods? They only actually fit on the base in one orientation due to the way they are made (each leg fitting into a specific slot). The two larger cymbals are situated on offset arms; however, this has little effect on the drums. Additionally, you risk having a cymbal in the wrong spot if you attach the offset carelessly.
I disassembled my medium cymbal to adjust the angle since I believed I had positioned it wrong. However, I should have searched for pictures of drum sets. Because it didn't match the apparent angle in the directions, it was in the correct position (matching the photo on the packaging). Therefore, I ought to have left things alone. However... I kept everything how I had it as I also found that the arrangement of the drum sets is a little erratic and seems to be up to the drummer.
I suggest building the tripod base without attaching the offset arm for the offset cymbals. By securing the tripod to the model base and then aligning the offset arm and cymbal as you believe they should be, you can correctly align it when you complete the final assembly if you keep it separate.
Regarding the alteration to the cymbals to give them shape, @iwallod's incredible performance served as my inspiration. I carefully hammered in the curvature that the cymbals should have using my fondant-shaping balls, a rubber mallet, and a couple of sockets from a socket-wrench set. To get the elevated area in the middle, I used a small ball and socket after using a large ball and socket for the overall design. It didn't work out the way I had hoped. I nearly blew out the slots in all three of the cymbals I attempted to shape; one cymbal had an unevenly raised center, and another cymbal collapsed as I was creating the overall curve. The start of the third build video in the playlist at the end of this post shows this process in all its savagery. Nevertheless, @iwallod's Instagram post, which is included below, also shows his far superior outcomes:
The drumsticks, on the other hand, were just… freehand. I used a hobby knife to carve in the general shape and sandpaper to smooth it / remove hanging splinters. Lather, rinse, repeat. Give up on one and start over on the other end of the toothpick. Finish with something that vaguely reminds me of a drumstick. Cut to length and round out the end. Then, they realize it's way too oversized for the model and do not care. Something like that. It took me a lot longer than I expected.
This build was quite tricky, although it was primarily made up of big pieces. It took roughly three hours to complete, and this included rebuilding one of the offset cymbal stands and shaping the cymbals.
